Affiliate Disclaimer: This post may contain affiliate links, which means I make a small commission off purchases, at no extra cost to you. Read my full disclosure here.
Health & Safety Disclaimer: This post may contain workout and health advice and information, designed for entertainment and/or educational purposes. Without delay, always consult your doctor before trying out a new fitness regimen. Bodyweight MAX should not be used as a substitute for professional medical services.
Hamstring Stretches for Lower Back Pain
The benefits of stretching your hamstrings can be twofold, because a lot of the possible hamstring stretches also require you to stretch your lower back. If you sit at a desk all day or experience the all-too-common aches in your lower back, I suggest trying some of these hamstring stretches for lower back pain. You will immediately feel the relief, and doing these hamstring stretches regularly will also help prevent lower back pain in the long term. Just be sure that you are engaging your lower back along with the hamstrings. A lot of these are popular yoga moves, and none of them need any equipment – although a yoga mat is recommended.
Downward Dog

Step 1: Get on the yoga mat on all fours.
Step 2: Make sure your palms are flat on the mat and arms are extended straight ahead as far as you can reach.
Step 3: Extend your legs as straight as you comfortably can, with your toes touching the mat.
Step 4: Lift your butt as high as you can without feeling discomfort.
Step 5: Engage your hamstrings and calf muscles with your outstretched legs. You should now feel the stretch in those areas.
Step 6: To engage your lower back, slightly bring your chest closer to the floor. You may feel more stretch in your shoulders as well, but the lower back should be the focus.
Step 7: Hold this position for 20-30 seconds.
Downward Dog – Bent Knees Variation
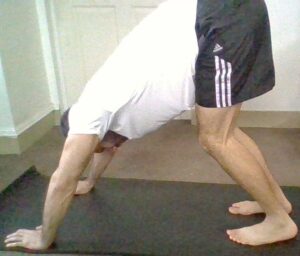
Note: Although this is a variation, I still do this stretch every single day! It puts more focus on your hamstrings and glutes, and feels amazing.
Step 1: Get on the yoga mat on all fours.
Step 2: Make sure your palms are flat on the mat and arms are extended straight ahead as far as you can reach.
Step 3: Instead of extending your legs back, this time bring your feet forward so that they are below your pelvis. I always try to get my feet flat on the mat (rather than just the toes), because the stretch feels more extensive that way.
Step 4: Lift your butt as high as you can without feeling discomfort.
Step 5: To engage your lower back, slightly bring your chest closer to the floor. You may feel more stretch in your shoulders as well, but the lower back should be the focus.
Step 6: Hold this position for 20-30 seconds.
Sitting Toe “Pull”
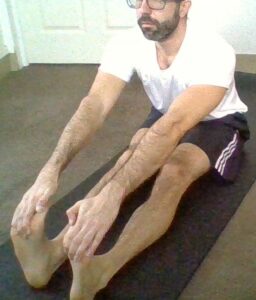
Note: Read the steps below to understand why I named this stretch “pull” instead of “touch.” People often lean way forward with this stretch, but that can be counterintuitive.
Step 1: Sit on the yoga mat, with good posture.
Step 2: Extend your legs and feet out in front of you. You may need to bend your knees depending on your flexibility.
Step 3: Slowly reach for your feet with your hands while maintaining proper, upright posture.
Step 4: Grab your feet, and gently pull your toes back toward your body, maintaining the posture. Do not lean forward.
Step 5: Since your posture is straight, you should feel the slightly resistant stretch in your lower back, along with your hamstrings, calves and glutes.
Step 6: Hold this position for 20-30 seconds.
Sitting Toe “Pull” – Single Leg Variation
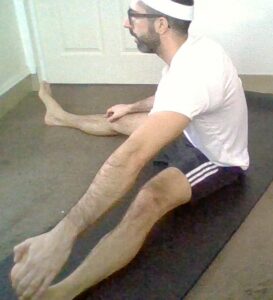
Note: I do both single leg variations after doing the normal “pull” that is described above, totaling three sitting toe pull stretches overall.
Step 1: Sit on the yoga mat, with good posture.
Step 2: Extend your legs and feet out in front of you. This time, separate them into a V shape as far as is comfortable for you. Again, you may need to bend your knees depending on your flexibility.
Step 3: Slowly reach for your left foot with your left hand while maintaining proper, upright posture. I rest my right hand on my thigh.
Step 4: Grabbing your foot, and gently pull your toes back toward your body, maintaining the posture. Do not lean forward or towards your left leg.
Step 5: Since your posture is straight, you should feel the slightly resistant stretch in your lower back’s left side, along with your left leg.
Step 6: Hold this position for 20-30 seconds.
Step 7: Repeat steps 1-6 with the right side.
“Good Morning” Stretches

Note: I like to do 3-5 “practice” bends before going into the full stretch, taking about 2 seconds bending down and 2 seconds coming back up. On the fifth “bend” I hold the stretch and follow the steps below. I find it helps ease my hamstrings and lower back into this stretch.
Step 1: Stand on the yoga mat with your feet close together.
Step 2: Bring your hands together as if you were going to pray.
Step 3: Keeping your upper body straight, bend at the waist while keeping your eyes looking ahead.
Step 4: Maintaining this form, bend down as far as is comfortable. If you can touch your toes without bending your knees, you can touch them for just a moment before bringing your hands back together and ensuring that your upper body stays straight. You should feel the stretch in your legs as well as your lower back.
Step 5: Maintain this position for 20-30 seconds.
Step 6: Slowly lift your upper body back up so you are standing normally.
“Good Morning” Stretches – Single Leg Variations
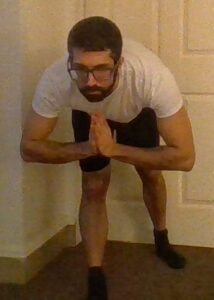
Note: Same thing as above with the 3-5 “practice” bends. I always do these single leg variations after the regular “Good Morning” stretch. It hits additional targets and places higher resistance on the legs and butt.
Step 1: Stand on the yoga mat, and take one step forward with your left foot, placing it flat on the floor in front of you.
Step 2: Bring your hands together as if you were going to pray.
Step 3: Keeping your upper body straight, bend at the waist while keeping your eyes looking ahead.
Step 4: Maintaining this form, bend down as far as is comfortable. If you can touch your left foot’s toes without bending your knees, you can touch them for just a moment before bringing your hands back together and ensuring your upper body stays straight. You should feel the stretch in your left leg as well as your lower back.
Step 5: Maintain this position for 20-30 seconds.
Step 6: Slowly lift your upper body back up so you are standing normally.
Step 7: Repeat steps 1-6 with the right leg.
“Good Morning” Stretches – Split Legs Variation
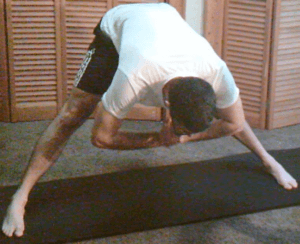
Note: Same thing as above with the 3-5 “practice” bends. I sometimes skip this stretch, but it is still great for the lower back.
Step 1: Stand on the yoga mat, and move your feet apart from each other as far as is comfortable.
Step 2: Bring your hands together as if you were going to pray.
Step 3: Keeping your upper body straight, bend at the waist while keeping your eyes looking ahead.
Step 4: Maintaining this form, bend down as far as is comfortable. If you can touch the floor without bending your knees, you can do so for just a moment before bringing your hands back together and ensuring your upper body stays straight. You should feel the stretch in your legs as well as your lower back.
Step 5: Maintain this position for 20-30 seconds.
Step 6: Slowly lift your upper body back up and bring your feet back together so you are standing normally.
Hamstring Stretches for Lower Back Pain – Feel Great & Prevent Aches
There are many great hamstring stretches for lower back pain, but these are the seven that I like to do on a regular basis. They are simple, effective, and do not take too much time. Best of all, they feel great and truly help get rid of and prevent lower back pain.
Do you have any of your own hamstring stretches for lower back pain? Leave me a comment about it below! If you’re interested in other lower body stretching exercises, check out my guide to hip stretches by clicking here.
