Affiliate Disclaimer: This post may contain affiliate links, which means I make a small commission off purchases, at no extra cost to you. Read my full disclosure here.
Health & Safety Disclaimer: This post may contain workout and health advice and information, designed for entertainment and/or educational purposes. Without delay, always consult your doctor before trying out a new fitness regimen. Bodyweight MAX should not be used as a substitute for professional medical services.
You may look at the title of this post and think, “really? WRIST workouts? Don’t make me laugh!” But did you know that, despite their comparatively small size, your wrists are incredibly complex joints? The wrist alone has:
- Six Major Tendons

- Four Major Ligaments
- Five Major Nerves
- Eight Bones
Despite being made up of all these small parts, the wrists are quite fragile in comparison to other joints on our bodies. Furthermore, have you ever thought about how much we depend on our wrists – both while working out and in our daily lives? Where would the human race be without our beloved wrists?
This is why it is so important to pay close attention to your wrists, because all it takes is one small slip-up to cause a sprain, strain or break in the wrist. Such an injury can set you back from your workout goals for weeks, if not MONTHS. And while people who work out with weights should pay attention to this post, those of us who practice and train with calisthenics need to be especially careful. Handstands, variations of pushups, pullups, and dips – they all put a lot of pressure on the wrists. Handstand training in particular is when you really need to mind the fragility of your wrists.
I don’t want you to risk injuries in the wrists, and that is why I decided to write up this post on amazing wrist workouts. These don’t need to be the only focus of your workout, and in fact, I would actually suggest doing just a few short sets during your warmup. Read below for a few ideas – no need to do all of these wrist workouts. Perform just the one or two that you can, and slowly work your way up to the tougher ones. You don’t want to spend too much time on these that it takes away from your regular workout, but still enough to build the necessary wrist strength.
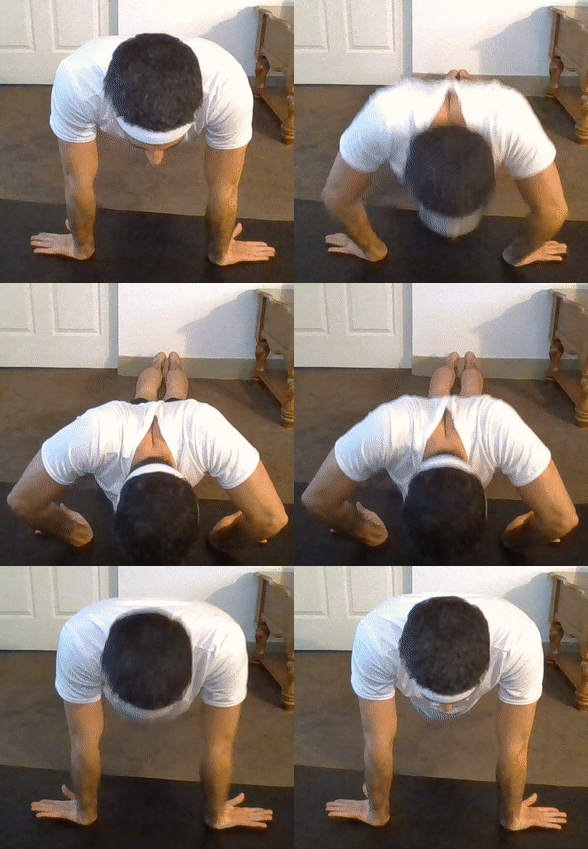
Wrist Workout 1: “Fin” Pushups
Note to Beginners: ONLY try this one on your knees. Once you feel confident in your strength after many of these wrist workouts, you can move into the full pushup form.
Total Sets: 3
Reps per Set: 5
Break Between Sets: 20 seconds
Step 1: Place the backs of your hands on a soft surface, like a yoga mat. This will NOT feel natural or comfortable, and the mat will help a lot. Make sure your wrists are shoulder-width apart
Step 2: Extend your arms fully, and move your legs back to get into a pushup position.
Step 3: Perform a pushup, except you will feel most of the stress going into your wrists instead of your arms and chest. Your elbows will naturally flare outward, which typically is a no-no with pushups, but it is fine with the fin pushups.
Wrist Workouts 2: Rolling Wrist-Fist Pushups (Working Title)
Note to Beginners: ONLY try this one on your knees. Once you feel confident in your strength after many of these wrist workouts, you can move into the full pushup form.
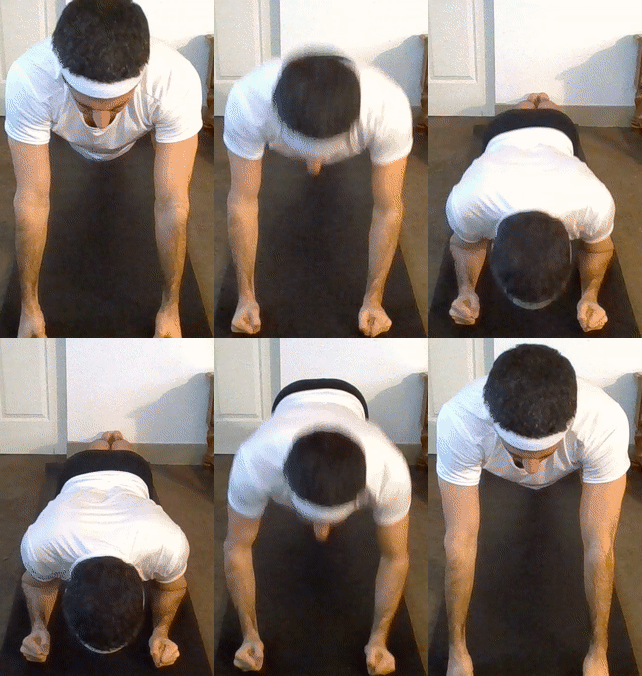
Total Sets: 3
Reps per Set: 5
Break Between Sets: 20 seconds
Step 1: Kneel on a yoga mat and form fists with your hands.
Step 2: Place your fists on the floor (thumbs should be visible) shoulder-width apart.
Step 3: Extend your arms and legs to get into a pushup position.
Step 4: “Roll” your fists backward so that you complete the motion on your forearms. Keep your elbows tucked in!
Step 5: Push yourself back up from the forearms, “rolling” your fists forward to return to the original position.
Wrist Workouts 3: Leaning Planche Pushups
Note to Beginners: ONLY try this one on your knees. Once you feel confident in your strength after many of these wrist workouts, you can move into the full pushup form.
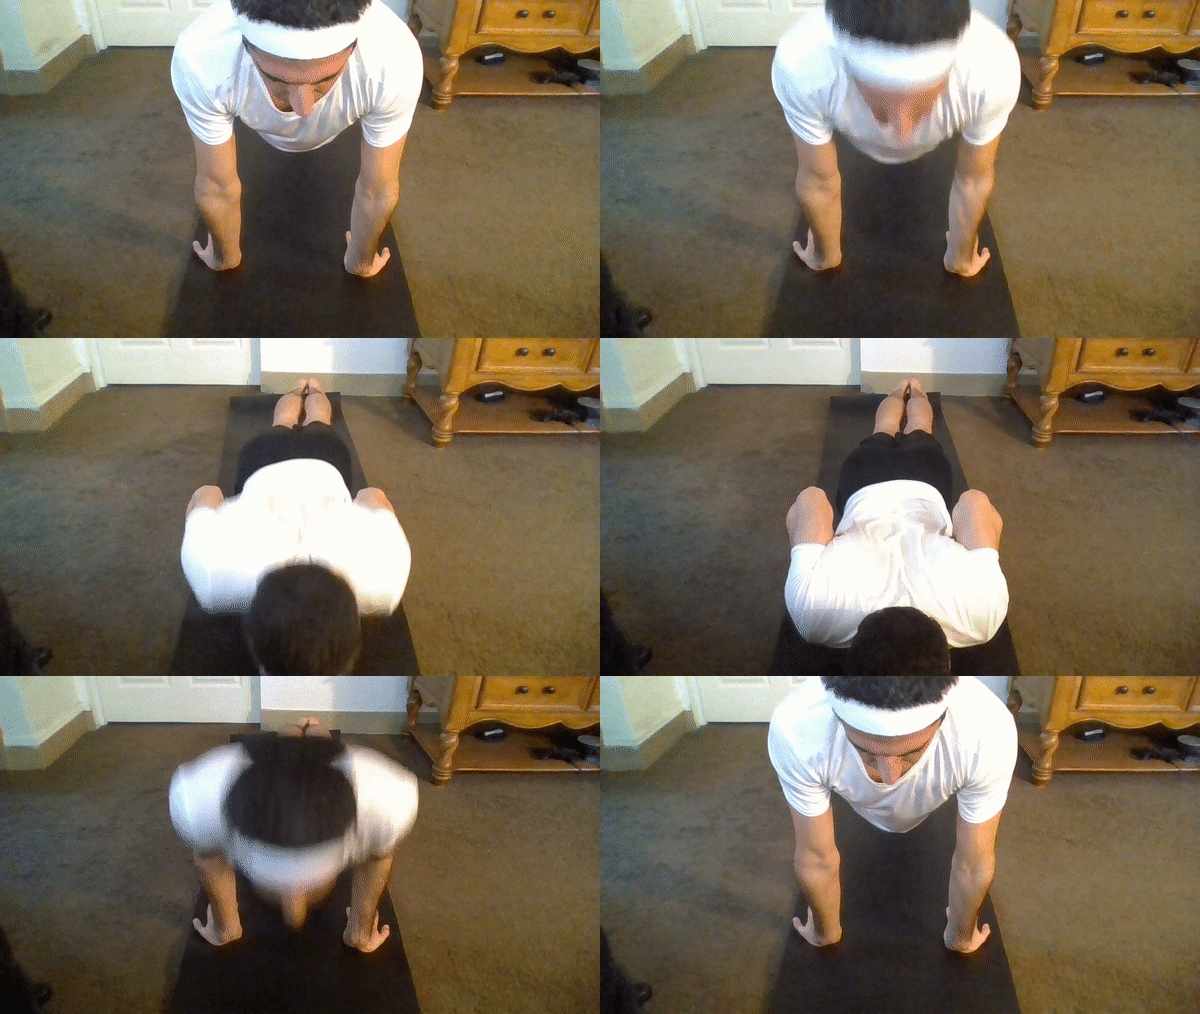
Total Sets: 3
Reps per Set: 5
Break Between Sets: 20 seconds
Step 1: Kneel on a yoga mat and place your palms down with your fingers facing towards you shoulder-width apart. This will feel unusual, but not as weird as the fin pushups.
Step 2: Extend your arms and legs to get into a pushup position.
Step 3: Perform a pushup. Unlike a normal pushup, you will feel intense weight in your inner wrists and forearms. Make sure that your elbows do not flare out. This is a great progression for the planche, too!
Wrist Workout 4: Tricep Extension Pushup
Note to Beginners: ONLY try this one on your knees. Once you feel confident in your strength after many of these wrist workouts, you can move into the full pushup form.

Total Sets: 3
Reps per Set: 10
Break Between Sets: 20 seconds
Step 1: Kneel on a yoga mat and place your palms and forearms fully on the mat, shoulder-width apart.
Step 2: Extend your legs to get into a pushup position.
Step 3: Using your forearms and wrists, push yourself up into a pushup position. You will eventually feel a lot of burn in your triceps, as well. Keep your elbows tucked in.
Step 4: With complete control, slowly lower yourself back down. Gravity is your enemy with this wrist workout – don’t let yourself just drop back down.
Wrist Workouts 5: Finger Walks and Finger Pushups
Note to Beginners: ONLY try this one on your knees. Once you feel confident in your strength after many of these wrist workouts, you can move into the full pushup form.
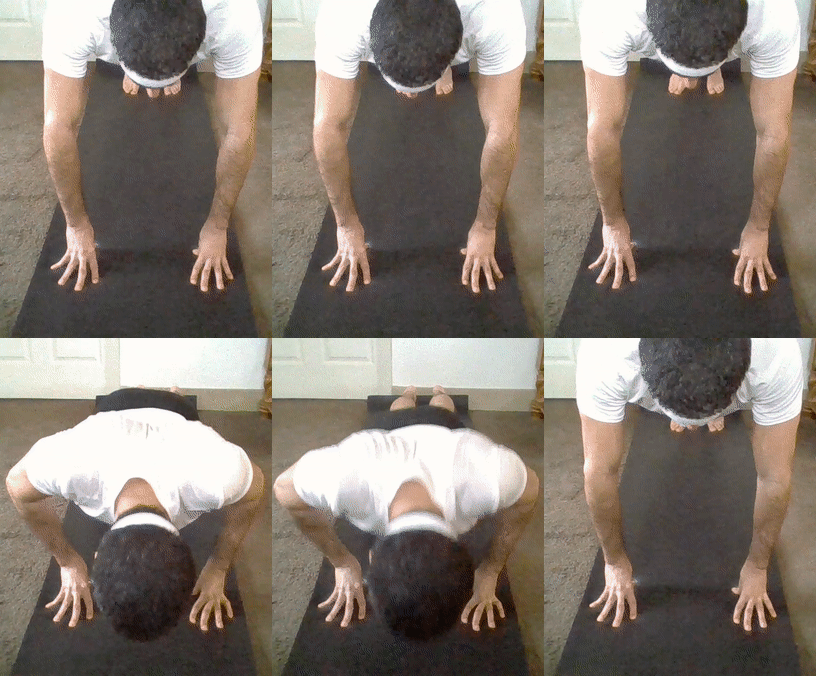
Total Sets: 3
Reps per Set: 10 Finger Walks; 5 Finger Pushups
Break Between Sets: 20 seconds
Step 1: Kneel on a yoga mat and place your fingertips on the mat, shoulder-width apart.
Step 2: Extend your legs to get into a pushup position. You will immediately feel the weight on your fingers.
Step 3: Perform a finger walk with each arm once or twice, then lower yourself for the finger pushup.
Wrist Workouts 6: Hanging from a Bar
For beginners, I suggest starting with the 2-handed hang. You can really do either one though – obviously, 1-handed is much tougher. These are amazing for both wrist strength and grip strength!


Total Sets: 1
Time: 10 seconds (one-handed); 20-30 seconds (two-handed).
NOTE 1: As you improve, you can just hang until failure.
NOTE 2: In the images, I am wearing a weighted vest. Don’t worry about doing that yourself–your bodyweight alone is enough until you feel strong enough to add more weight.
Break Between Sets: 20 seconds
Step 1: Pretty simple, but never easy. Perform a dead hang from the bar, and hold it! You might need to bend your knees depending on the height of the bar.
Don’t Take Your Wrists for Granted
Wrist injuries are among the most common for people who practice calisthenics. If you are training for the handstand, then you absolutely must practice at least one of these wrist workouts on a regular basis. Even if you’re not, it is still so important to keep your wrists strong and flexible, just in case you take an accidental tumble. And remember to stretch! Check out my guide to hand-wrist-forearm stretches.
What wrist workouts do you do regularly? Post them in the comments below!

